Showing posts with label bling. Show all posts

Tuesday, February 24, 2015

Sparkle & Bling Mixed Media Canvas

Several months ago, my boss came into work to bring in some inventory that had just arrived.  As she was pulling things out, she handed me a bag and said "Here, I bet you can do something with this".  It was a cake topper that a vendor had sent her (we don't carry any cake decorating supplies).  I held onto it for a while, but pretty much knew it was going to go on a mixed media piece - and, when I found the time, that's just what happened!


I had a ton of fun making this, and the friend I gave it to seemed to love it.


I did film a process video, while making this.


Product List:
Art Alternatives Canvas Panel 8x10 (Gesso Triple Primed)
Prima Crackle Stencil #564247
Golden Modeling Paste
Delta Ceramcoat Acrylic Paint: Hydrangea Pink
Apple Barrel Acrylic Paint: Ivory White
FolkArt Acrylic Paint: White
Stampendous Faded Text Stamp
Stampendous Ornate Textured Background Stamp
Stazon Ink: Jet Black
Prima Fairy Belle Paper
Liquitex Matte Gel Medium
Celebrate It Wide Lace
Prima Fleur stencil # 564278
Homemade mists: Gold & Sparkle
Distress Ink: Vintage Photo
Offray Lace
5" Paper Doilies
Recollections Vintage Romance Alphabet Stamps
Memento Luxe Ink: Espresso Truffle
Flourishes cut on my Silhouette
Versamark Ink
Gold Embossing Powder
Eiffel Tower piece is a cake topper (gifted to me by my boss)
IamRoses cherry blossoms
Martha Stewart Leaf Branch Punch

Finishing Touches done off camera:
Pearls from my stash
Metal Butterfly (From Michael's.  Was a clip from the spring section that I cut apart)
Zing Embossing Powder: Blush & Gold Sparkle (to color butterfly)
Sewology Buttons
All Purpose Ink For Fantast/x: Vegas Gold

Challenges:


Have a wonderful day!

Sunday, January 25, 2015

Believe in Magic

I'm back again with another card for the challenge over at 613 Avenue Create!  This week our twist on the Anything Goes Challenge, is to create your own challenge using the table I've marked below.

The wonderful sponsor that I was able to work with this week is Bugaboo Stamps.


I was using the "Unicorn" image from Bugaboo.  I used my Distress Markers to watercolor the image.  Then I used Stickles (both in clear and gold) to add some sparkle to the unicorn's horn and hooves.  I little bit of Glossy Accents was added to the eye for some depth and shine.  I topped the flowers in the image with some I punched our of scrap cardstock, and added some buttons from my stash to the centers.


I prepped some patterned papers from my stash in a couple ways.  The floral paper had a design added to it using a stencil I have (it was a cheap set of various patterns from Walmart), and some glitter embossing paste.  I used a Stampabilities stamp and Versamark to stamp on the blue dot paper, and then heat embossed the panel with some gold embossing powder.  I backed the panels with a piece of solid aqua card stock and some pearlized gold paper.  I also added a bit of satin ribbon from my stash.  Then I added the panels to my square card base.


I stamped the sentiment (for both the inside and outside) in Versamark and again heat embossed them in gold.  I cut a fishtail on the paper strips, and I added a few tiny gemstones for some bling.


Be sure to stop in over at 613 Avenue Create for the creations by my amazing teamies!

Challenges:

Tuesday, November 6, 2012

The Littlest Mermaid


Materials Used:
  • Aqua, white Card stock
  • Teresa Collins "Sweet Afternoon" paper pac
  • Sliekje stamp (colored markers, background colored with pencils)
  • Swirls on background paper made with colored pencils and white gel pen
  • Spare Parts by the Paper Studio self adhesive pearls
  • Viva pearl paint pen in cream
  • Random Adhesives
Challenges:


Monday, November 5, 2012

Altered Box

Sometime ago, I purchased one of those small balsa wood boxes from Michael's.  I had entirely to many ideas of what to do with it, so I had set it aside to ponder it's fate.

Several months later, I stumbled across it and decided to just start and decide what it would be as I went.  As it turned out, this particular little balsa box had big dreams of being a small jewelry box.  I'm probably going to be giving this to my niece for her birthday.  


I painted the entire box with "French Blue" Folk Art acrylic paint.  Then I used my Sketchy Flourishes stamps, and Zing gold embossing powder to decorate the sides of the box.

I glued white Offray Classical lace around the edge of the lid, and topped that with some Wright's Creative Classics Fused Pearls.


I made three roses (using my The Paper Studio retro flower punch, and a leaf punch from T.P.S.), and used more of the pearls and some Dress It Up! buttons.  The gems are from Zva Creative.


The "feet" are Wood Shoppe Candle Cup pieces, stacked on top of Toy Wheel pieces.  I painted them white (with a drop of parchment for a bit of warmth), and then added gold sections for accent.  I coated the pieces in clear Rock Candy and let them dry, before attaching them with some Glossy Accents.

I forgot to get a photo of the inside, but I had painted it in the blue as well, and then lined the interior with some pink felt.

And VOILA!  A jewelry box!


    Tuesday, April 10, 2012

    Have yourself a blingy little Christmas

    I've been wanting to get a blingy Christmas card done, and after a bit of thought I decided how to do it.


    It's hard to see in the photos, but there is a bit of red ink on the raised portions of the embossed panel.  It's visible in person, but not so much in pictures....


    Materials Used:
    • Red, black, grey Card stock
    • aluminum foil
    • The Paper Studio embossing folder: Intricate Swirl
    • Red ink (unsure of brand as label is torn, but it smells like cinnamon!) 
    • The Paper Studio Cardstock sticker
    • The Paper Studio adhesive gemstones
    • Celebrate It Basic Narrow ribbon
    • white pipe cleaner
    • Random Adhesives
    Challenges:

    Monday, March 26, 2012

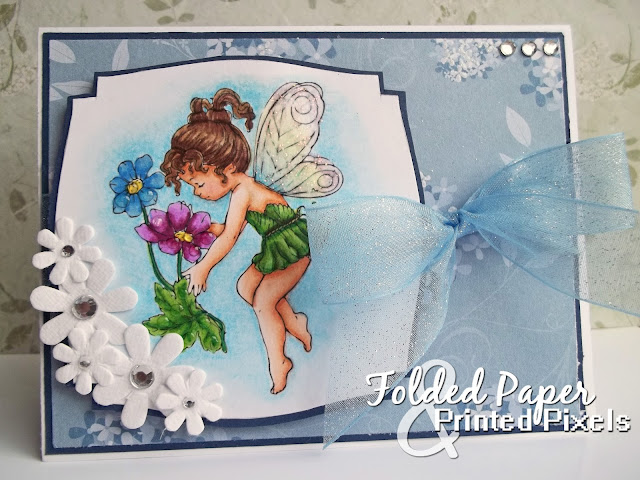
    Fairy Flowers

    I'm really excited....I normally figure out what shape I want around my stamp and outline it in Photoshop when I'm sizing the stamp to print (which was done with this card).  Then I cut it out after I color...but Eldon bought me my first two Nestability die sets this weekend!   So, you will probably get sick of seeing those shapes soon!! 

    I'm still working on getting my coloring right with the few Copics and Prismacolor markers I have (I also use a 36 count Bic Mark-It set). I love the way this card turned out!

    Outside:


    Inside:

    The camera didn't pick up just how SPARKLY this card is!  The background paper had glitter accenting the flowers, and the ribbon also has glitter in it (which rubbed off onto the paper as I was tying the bow).  Plus I added clear glitter glue over the wings, and a few dabs of glossy accents as dewdrops on the flowers.  


    Materials Used:
    • White, Navy card stock
    • Colorbok "Earthtones" patterned paper pack
    • Coloring Image by Ina Jane (colored with markers and pencils)
    • Inside sentiment by me - colored with markers (was a freebie at The Sherlocks Home)
    • Celebrate It Sheer Ribbon
    • Bazzil Basics Paper self adhesive gems
    • Flora Doodles Jeweled flowers
    • Studio G Clear Glitter Glue
    • Random Adhesives (including Glossy Accents)
    Challenges:

    Friday, February 3, 2012

    Super Quick Valentine


    Materials Used:
    • Kraft, heritage red, black, and white Card stock
    • Patterned paper by The Paper Studio
    • The Paper Studio embossing folder - Intricate Swirl
    • Digistamp: "Love You" (precolored)
    • Zig Memory Systems Archival ball pen
    • Bazzil Basics Paper self adhesive gems
    • Random Adhesives

    Thursday, January 26, 2012

    Coordinating Tag

    I decided to make a tag that coordinated with the birthday card I posted last week, as I know there will be a gift included to the person receiving that card.  I wanted the tag to be similar, but not completely matchy-matchy, and this is what I came up with.


    Materials Used:
    • Kraft tag (Not sure the brand, I have several of these just floating around in my supplies)
    • Burgundy card stock
    • Black & Cream Script paper from The Paper Studio
    • Distress Ink in Vintage Photo
    • Inkadinkado Clear Stamps in Sketchy Flourishes
    • Studio G Stamp
    • Studio G Pigment Ink - a chocolate brown color, and white
    • Chipboard shape and "bling" frame unknown brands - both from Honk's Dollar store
    • homemade glimmer mist in gold
    • Bird image from The Graphics Fairy
    • EK Success Butterfly Punch
    • The Paper Studio self adhesive pearls
    • Offray Fancy Lace Cream
    • Elements hemp Cord - Earthtones
    • Random adhesives

    Saturday, January 21, 2012

    Blingy Valentine

    The flowers on this card were all made by me.  Actually, on my cards, 99% of the flowers used are made by me.  I usually have so many other things on my wishlist for supplies, that flowers usually don't make it on the list.


    The white roses are folded/quilled, and the red and pink roses are created from punches.

    Materials Used:
    • White, red, pink, green card stock
    • D'Vine Swirl Cuttlebug embossing folder
    • Celebrate It Ribbon
    • Details Satin Ribbon
    • Sentiment made by me on computer
    • EK Success Punches
    • 24 gauge floral wire
    • Bead Treasures glass beads: 4 mm pearls, 4 mm fauceted
    • The Paper Studio self adhesive pearls
    • Random adhesives
    Challenges: