Showing posts with label Favorite. Show all posts

Wednesday, September 5, 2018

Gratitude Journal | Video

The weather has started to cool  just a bit - and I've started noticing a slight yellowing of some of the leaves in the trees.  There's a hint of fall in the air!  One thing that always seems to strike me as fall approaches, is the need to stop and spend a little more time in gratitude for the things I have in my life.

This small Gratitude Journal, will allow bullet journal style entries, to keep track of daily reasons to be thankful.  Created using Fun Stampers Journey products.

The project I'm sharing today, is a small Gratitude Journal.  I created this using index cards, with the intent of using it similarly to a bullet journal.  Very short, daily, entries - listing out some of the many things I'm thankful for.  I love the concept of a Gratitude Journal, and hope to be able to establish the habit.


As shown in the video, I created the covers for the journal, using a medium weight chipboard that I had.  I tend to hoard things that I think are useful.  I have a drawer full of chipboard, that was left over from packaging, or cast off from other uses.

This small Gratitude Journal, will allow bullet journal style entries, to keep track of daily reasons to be thankful.  Created using Fun Stampers Journey products.


I wrapped the chipboard in Peaches and Cream Card Stock, and then layered up some of the Good Life Prints.  A couple of banners were added - one with a heat embossed sentiment - stacked in with some die cut leaves. I also added a few Fashion Gold pieces, along with a bow. 

This small Gratitude Journal, will allow bullet journal style entries, to keep track of daily reasons to be thankful.  Created using Fun Stampers Journey products.

The covers along with the index cards, had holes punched in them to fit the rings, using the Press Punch.  

This small Gratitude Journal, will allow bullet journal style entries, to keep track of daily reasons to be thankful.  Created using Fun Stampers Journey products.

This cute little journal would also make a fun gift!   They could be made to give out for a month long gratitude challenge to family and friends - perhaps leading up to Thanksgiving?

This small Gratitude Journal, will allow bullet journal style entries, to keep track of daily reasons to be thankful.  Created using Fun Stampers Journey products.

As always, I am thankful for you!

Thanks for stopping by!

Much love,                    

Supplies Used:
Use this easy list to find the products I used in my projects. (Contains affiliate links - where I earn a commission from purchases made from my links, at no cost to you. Your support helps me keep this blog going, and continue to create - Thank you! Affiliates and disclosures can be found here.) 


Stamps: 
Cottage Bouquet Stamp Set SS-0606

Inks:
Clear Pigment Ink Pad IP-0102, Gold Embossing Powder IP-0101, Gold Silk IP-0096

Papers:
Peaches and Cream 8.5"x11" Card Stock CS-0144, Good Life Prints PP-0055, Pumpkin Bread 8.5"x11" Card Stock CS-0098. Fresh Forest 8.5"x11" Card Stock CS-0011, Fresh Sage 8.5"x11" Card Stock CS-0143, Lemongrass 8.5"x11" Card Stock CS-0019, Mirror Gold CS-0136

Embellishments:
Fresh Sage Satin Ribbon AC-0409, Fashion Gold AC-0292

Tools:
Summer Branch Die DI-0162, Journey Platinum Machine TO-0090,  Journey Blooms Paper Trimmer TO-0039, Crease Tool TO-0040, Detail Pro Shears (4.5") TO-0063, Heat Gun TO-0083, Journey Colorless Blender JM-0095, Dauber Dowel - Large TO-0138, Press Punch BD-0067

Adhesives:
White Liner Tape AD-0001, Journey Craft Glue AD-0111,  Journey Foam Squares - Medium AD-0085

Friday, August 31, 2018

Simple Good Life

I adore the Prints from the Good Life Collection.  The more muted, and soft tones, and country/farm style graphics feel very familiar and comforting.  For today's card, I wanted to feature some of those pretty patterns, and chose to create a card without a sentiment - which allows it to be sent for a wider variety of reasons.  

Layered farmhouse / country style prints, and gorgeous denim look ribbon create an amazing backdrop for the stamped flower image from Fun Stampers Journey's Flower Shower stamp set - colored with Journey Color Burst colored pencils.

I layered up my chicken wire patterned paper, on top of the blue buffalo check paper.  I wrapped a bit of the Cotton Chambray Shirt ribbon (LOVE!!!  This is a must have in my book!) around the layers, and then tied a small bow.  I layered this panel on top of the soft gray wood panel.

Layered farmhouse / country style prints, and gorgeous denim look ribbon create an amazing backdrop for the stamped flower image from Fun Stampers Journey's Flower Shower stamp set - colored with Journey Color Burst colored pencils.

I stamped and die cut the flowers from the Flower Shower stamp set, and colored them in with the Color Burst pencils.  This layer was glued onto the card front, and then I adhered the whole card front to a Whip Cream card base.  A few pearls up in the corner finished off the card.  

Layered farmhouse / country style prints, and gorgeous denim look ribbon create an amazing backdrop for the stamped flower image from Fun Stampers Journey's Flower Shower stamp set - colored with Journey Color Burst colored pencils.

I adore how this card looked completed.  The flowers pop against the denim look of the ribbon, and the pearls add just a bit more elegance.  

♥   ♥   ♥   ♥   ♥

It's almost here!  Tomorrow is the day - September's Coach Collective is nearly here.


Coach Collective's September edition is available September 1st, but if you would like to preorder yours today, just click on the PayPal button below.


On September 1st, you will be among the first to receive the September edition of Coach Collective.

All 12 tutorials will be sent to you in one concise document, ready for you to enjoy! Coach Collective project tutorials are created with currently available supplies from Fun Stampers Journey and provide measurements in inches only.


 You can get this tutorial collection in a few ways: 

  • The first option is to use the Paypal Button below to order the PDF collection for $15, and I will send it out to you on September 1st.* 
  • The second option, is to break out that wish list! With a brand new catalog, this one will be easy! Make a purchase of $50 or more between Sept 1st, and Sept 30th in my Fun Stampers Journey store, and I will send you this tutorial collection for FREE, without you having to do anything else!* 
  •  The third and final option is joining my team! If you've thought about joining FSJ as a coach, one of the perks of being on my team, is that you get any tutorial I create for FREE!

* * * * * * * * * * * * * * * * * * * * * * * *
Coach Collective | September 2018 Preorder

If you are making a purchase - of $50 or more - from my FSJ store (09/1/18 - 09/30/18), 
you will receive this collection as a bonus, please do not purchase through this button.  
The tutorial will be sent out to you, after I receive confirmation of your order. 
Order Bonus not available outside of July dates.  Thanks!

* * * * * * * * * * * * * * * * * * * * * * * *

*Please note: I send the tutorial out, via email, myself.  If for some reason, you have not received it within 12 hours (and you've checked to make sure it's not in your spam folder), please email me at muchlovesara (at) gmail.com


I am thrilled to be collaborating with these talented ladies to bring you creative project tutorials featuring current Fun Stampers Journey products and it all starts again Saturday September 1st.  See you then! 


Thanks for stopping by!

Much love,                    

Supplies Used:
Use this easy list to find the products I used in my projects. (Contains affiliate links - where I earn a commission from purchases made from my links, at no cost to you. Your support helps me keep this blog going, and continue to create - Thank you! Affiliates and disclosures can be found here.) 


Stamps: 
Flower Shower Stamp & Die Bundle BD-0415

Inks:
Black Licorice True Color Fusion Ink IP-0041, Journey Color Burst Pencils JM-0077

Papers:
Whip Cream 8.5" x 11" Card Stock CS-0040, Good Life Prints PP-0055

Embellishments:
Pearls AC-0024, Cotton Chambray Shirt Ribbon AC-0411

Tools:
Journey Platinum Machine TO-0090,  Journey Blooms Paper Trimmer TO-0039, Crease Tool TO-0040, Detail Pro Shears (4.5") TO-0063, Grand Pro Shears TO-0064, Heat Gun TO-0083

Adhesives:
Journey Craft Glue AD-0111, Journey Foam Squares - Medium AD-0085

Friday, August 10, 2018

Life in Color Mixed Media Paintbrush

The mixed media options from Fun Stampers Journey, were one of the first things that drew me towards the company.  I loved creating canvases, and other pieces using a wide variety of products, and seeing all of my favorite things in one place made me happy!  

And then, I really didn't get around to using them much.  Mixed media projects, for all their fun, are a bit more time consuming than cards - just allowing for drying time and clean up, they take a while.  But, I've been itching to work on something, so I pulled out a bunch of supplies and got to work.

This mixed media paintbrush was created using Fun Stampers Journey products, including the Color Pop Stamp Set.  Lots of layering went into creating this fun accent piece that's perfect for display in a studio or craft room.

This mixed media paintbrush was created using Fun Stampers Journey products, including the Color Pop Stamp Set.  Lots of layering went into creating this fun accent piece that's perfect for display in a studio or craft room.
I started out with a paintbrush I had purchased from the dollar store.  Because this had a bit of a glossy finish, I gave the handle a quick sanding, before adding multiple coats of gesso to the handle and finial.  I used my heat gun to dry the gesso a bit quicker in between layers.  After the final layer was dry, I added some modeling paste through a stencil.  I sat that aside for a couple of hours to dry thoroughly, before coming back to use reinkers to dye the bristles of the brush.

I used gloves to keep my hands clean, and started with the yellow ink.  I put a few drops of reinker up where the bristles attach to the brush, and then worked them down the length, adding more reinker as necessary.  Then I moved on to other colors, repeating the process.  When that was done, I set the brush aside, again for a couple of hours, to allow the ink to dry.  I did wind up coming back to that and adding a thin layer of gesso over the top - this both muted the color somewhat, as well as giving the bristles a little more texture for the reinker to dry to.

I covered the bristles with a paper towel to spray the handle.  I layered the Color Splashes, drying with my heat gun between layers, until I was satisfied with the color result.  I then generously sprinkled the whole project - handle and bristles - with sparkle silk.

I heat embossed my sentiment onto vellum and fussy cut it out, and die cut two border strips, as well as a strip of Black Licorice.  I used White Liner tape to adhere the two border pieces together, and then adhere the border around the bottom of the finial.  I added the Black Licorice strip with the white liner as well.  Then I attached my sentiment using liquid glue.

This mixed media paintbrush was created using Fun Stampers Journey products, including the Color Pop Stamp Set.  Lots of layering went into creating this fun accent piece that's perfect for display in a studio or craft room.

Before moving on to further embellishment, I spread a thick line of craft glue on my work surface, and then ran the bottom portion of the bristles back and forth through the glue a few times.  Then I carefully sprinkled the sparkle dust over the glue, and knocked off the excess.  I laid the brush down to dry, and attached the Fashion Gold pieces, along with the ribbon to the handle and flowers.  After the glue had dried, I came back with my blending brush and some silks, to add a bit of messy color to the flowers.  Once the whole piece had dried overnight, I again knocked off the excess sparkle dust, in order to help keep the glitter fallout to a minimum.

This mixed media paintbrush was created using Fun Stampers Journey products, including the Color Pop Stamp Set.  Lots of layering went into creating this fun accent piece that's perfect for display in a studio or craft room.

This was a super fun project.  One thing I love with mixed media is how your project changes with each added layer.  And each project is unique.  Even using the exact same products, each person creating will have a slightly different result.

Thanks for stopping by!

Much love,                    

Supplies Used:
Use this easy list to find the products I used in my projects. (Contains affiliate links - where I earn a commission from purchases made from my links, at no cost to you. Your support helps me keep this blog going, and continue to create - Thank you! Affiliates and disclosures can be found here.) 


Stamps: 
Color Pop Stamp Set SS-0613

Inks:
Candy Apple True Color Fusion Re-Inker RI-0001, Huckleberry Fusion True Color Fusion Re-Inker RI-0012, Lemon Drop True Color Fusion Re-Inker RI-0026, Limeade Splash True Color Fusion Re-Inker RI-0025, Grape Fusion True Color Fusion Re-Inker RI-0033, Citrus Cooler True Color Fusion Re-Inker RI-0047, Clear Pigment Ink Pad IP-0102, Gold Embossing Powder IP-0101, Sparkle Silk IP-0126, Cool Pool Color Splash IP-0076, Lemongrass Color Splash IP-0078, Shimmer Gold Color Splash IP-0081, Blue Lagoon Color Splash IP-0084, Cranberry Bliss Silk IP-0094, Gold Silk IP-0096, Turbo Teal Silk IP-0119

Papers:
Lemongrass 8.5" x 11" Card Stock CS-0019, Black Licorice 8.5" x 11" Card Stock CS-0003, Journey Vellum PP-0044

Media:
Journey Gesso JM-0072, Journey Modeling Paste JM-0073, Vintage Screen Stencil JM-0002, Spatula TO-0089

Embellishments:
Journey Sparkle Dust AC-0013, Sweet Blooms AC-0329, Gingham Ribbon Black Licorice AC-0096, Fashion Gold AC-0292

Tools:
Border Basics Die Set DI-0144, Journey Platinum Machine TO-0090,  Journey Blooms Paper Trimmer TO-0039, Crease Tool TO-0040, Detail Pro Shears (4.5") TO-0063, Heat Gun TO-0083, Journey Blending Brush - Large TO-0099

Adhesives:
White Liner Tape AD-0001, Journey Craft Glue AD-0111

Monday, August 6, 2018

Shades of Gray

This card idea has been floating around in my head for a while.  It's so simple in design, but is striking with the monochromatic background and golden sentiment.

This pretty monochromatic card was created using the Flower Shower stamp set, along with the Welcome ATS set.  All supplies used were from Fun Stampers Journey.

My sentiment was stamped and heat embossed first.  Then, I stamped the floral image in opposite corners and colored it using only white, gray, and black pencils.  I laid a rectangular die over the panel, and used my black pencil to trace inside of the die to create the lined frame around the card.  Just a few pearls added a little interest around the floral images.

This pretty monochromatic card was created using the Flower Shower stamp set, along with the Welcome ATS set.  All supplies used were from Fun Stampers Journey.


Thanks for stopping by!


Much love,                                                                             


Supplies Used:
Use this easy list to find the products I used in my projects. (Contains affiliate links - where I earn a commission from purchases made from my links, at no cost to you. Your support helps me keep this blog going, and continue to create - Thank you! Affiliates and disclosures can be found here.) 


Stamps:
Welcome ATS AT-0269, Flower Shower SS-0626

Inks:
River Stone True Color Fusion Ink IP-0053, Clear Pigment Ink IP-0102, Gold Embossing Powder IP-0101, Journey Color Burst Pencils JM-0077

Papers:
River Stone 8.5" x 11" Card Stock CS-0094, Tin Pail 8.5" x 11" Card Stock CS-0147

Embellishments:
Pearls AC-0024,

Tools:
Journey Rectangles Die Set DI-0041, Journey Blooms Paper Trimmer TO-0039, Crease Tool TO-0040

Adhesives:
Easy Glide Permanent Adhesive Runner AD-0081

Wednesday, August 1, 2018

Christmas Cookies using Stamps and Stencils | Video

I'll bet you're reading the title of this post, and expecting to see some packaging for Christmas cookies, right?  I mean, after all, I'm a stamper and paper crafter.

Guess what?  This post is ACTUALLY about the COOKIES!

The new FSJ Holiday Catalog is here!  And with the new catalog, is my final posting as a member of the 2017-2018 Designer Showcase team.  We were asked to participate in the launch for this new catalog, and I couldn't think of a better project, then this one that uses a technique I've shown before.

Today we're taking some of our paper crafting supplies to the kitchen, and we're decorating some fun Christmas cookies with them!

Creating amazing Christmas cookies is so easy, using paper crafting items!  Stamp or stencil on the royal icing to create intricate patterns, and adorable images that are sure to wow your neighbors this year.  These cookies are also easy and fun for DIY weddings, or parties.

We will need some iced cookies to work with.  Any roll out cookie will work (yes, even the tubes of dough sold in the refrigerated section of the grocery store).  I prefer to use my grandma's sugar cookie recipe - it makes yummy, and tender, cookies.   To ice the cookies, use royal icing, which hardens solid, and makes a great surface for stamping and stenciling - I like this recipe.  The icing needs to set for at least 8 hours (more if it's humid or cold), and preferably overnight so that it is dried all the way through.

Creating amazing Christmas cookies is so easy, using paper crafting items!  Stamp or stencil on the royal icing to create intricate patterns, and adorable images that are sure to wow your neighbors this year.  These cookies are also easy and fun for DIY weddings, or parties.Creating amazing Christmas cookies is so easy, using paper crafting items!  Stamp or stencil on the royal icing to create intricate patterns, and adorable images that are sure to wow your neighbors this year.  These cookies are also easy and fun for DIY weddings, or parties.

To begin decorating, we need a few NEW supplies - things like stamps, stencils, brushes and palettes.  For food safety purposes, please do not reuse items that you have used with inks or stamp cleaners.  You will want to wash surfaces with a mild detergent before use, however, if you intend to serve or sell these cookies, I stress using new, or food dedicated, items.  Stamps, stencils, brushes, and palettes may be used for paper crafting after, however, if you intend to use them on food items again, please reserve them strictly for that purpose.

Creating amazing Christmas cookies is so easy, using paper crafting items!  Stamp or stencil on the royal icing to create intricate patterns, and adorable images that are sure to wow your neighbors this year.  These cookies are also easy and fun for DIY weddings, or parties. #fsjallday #fsjJourneyHolidays

Fun Stampers Journey Supplies Used:

Stamps: 

Stencils:


We will also need a gel food coloring; a clear extract, or alcohol, for our ink & color; and a small, soft, good-quality, paintbrush that won't shed its bristles.

Creating amazing Christmas cookies is so easy, using paper crafting items!  Stamp or stencil on the royal icing to create intricate patterns, and adorable images that are sure to wow your neighbors this year.  These cookies are also easy and fun for DIY weddings, or parties. #fsjallday #fsjJourneyHolidays


I explain the full technique, in this video that I did on Facebook live.


How much fun are these cookies.  Your neighbors will be so impressed with your Christmas Cookie Tray this year.  And the new Holiday catalog has tons of fun stamps that you can use with this technique.  Maybe some gnomes?  Or that cute reindeer we used for Assembled this week?

Thanks for stopping by!


Much love,                                                                             
                                              
Supplies Used:
Use this easy link to find the products I used in my projects. (Contains affiliate link - where I earn a commission from purchases made from my links, at no cost to you. Your support helps me keep this blog going, and continue to create - Thank you! Affiliates and disclosures can be found here.) 


Monday, April 23, 2018

Vagabond Vintage Truck | Photo Heavy

A few weeks ago, I posted on my Instagram that I was starting my "big" project for Inking Idaho on the Road this year.  I always try to make one showpiece for my display at the event, and this year, I was inspired by one of the stamp sets from the Spring into Summer catalog that launched the beginning of the month.  The Happy Adventure Stamp Set  features a pickup truck with a bed full of flowers.  I wanted to recreate that in paper for the event.


I had no pattern, or instructions that I was following, just a lot of paper, a glue gun and an idea.  So, I started by cutting the "windshield" with one of the flap dies from the Envelo-Box die set.  I based all of the sizing and measurements from that first cut.  I started shaping and trimming the card stock from that point.


And would then add pieces to fill in as I went. 


I added some basic details as I went (if they would help with stability issues), and would go back to add final details at the very end. 


By the time I got the cab built, I knew that this project was going to work, and was starting to get really excited about it.  It took about 24 hours to complete the whole truck, with all the flowers in the bed - I lost count of how many sheets of card stock it took!


Ready to see the finished truck?

.

.

.

.

.

.

.

.

.

.

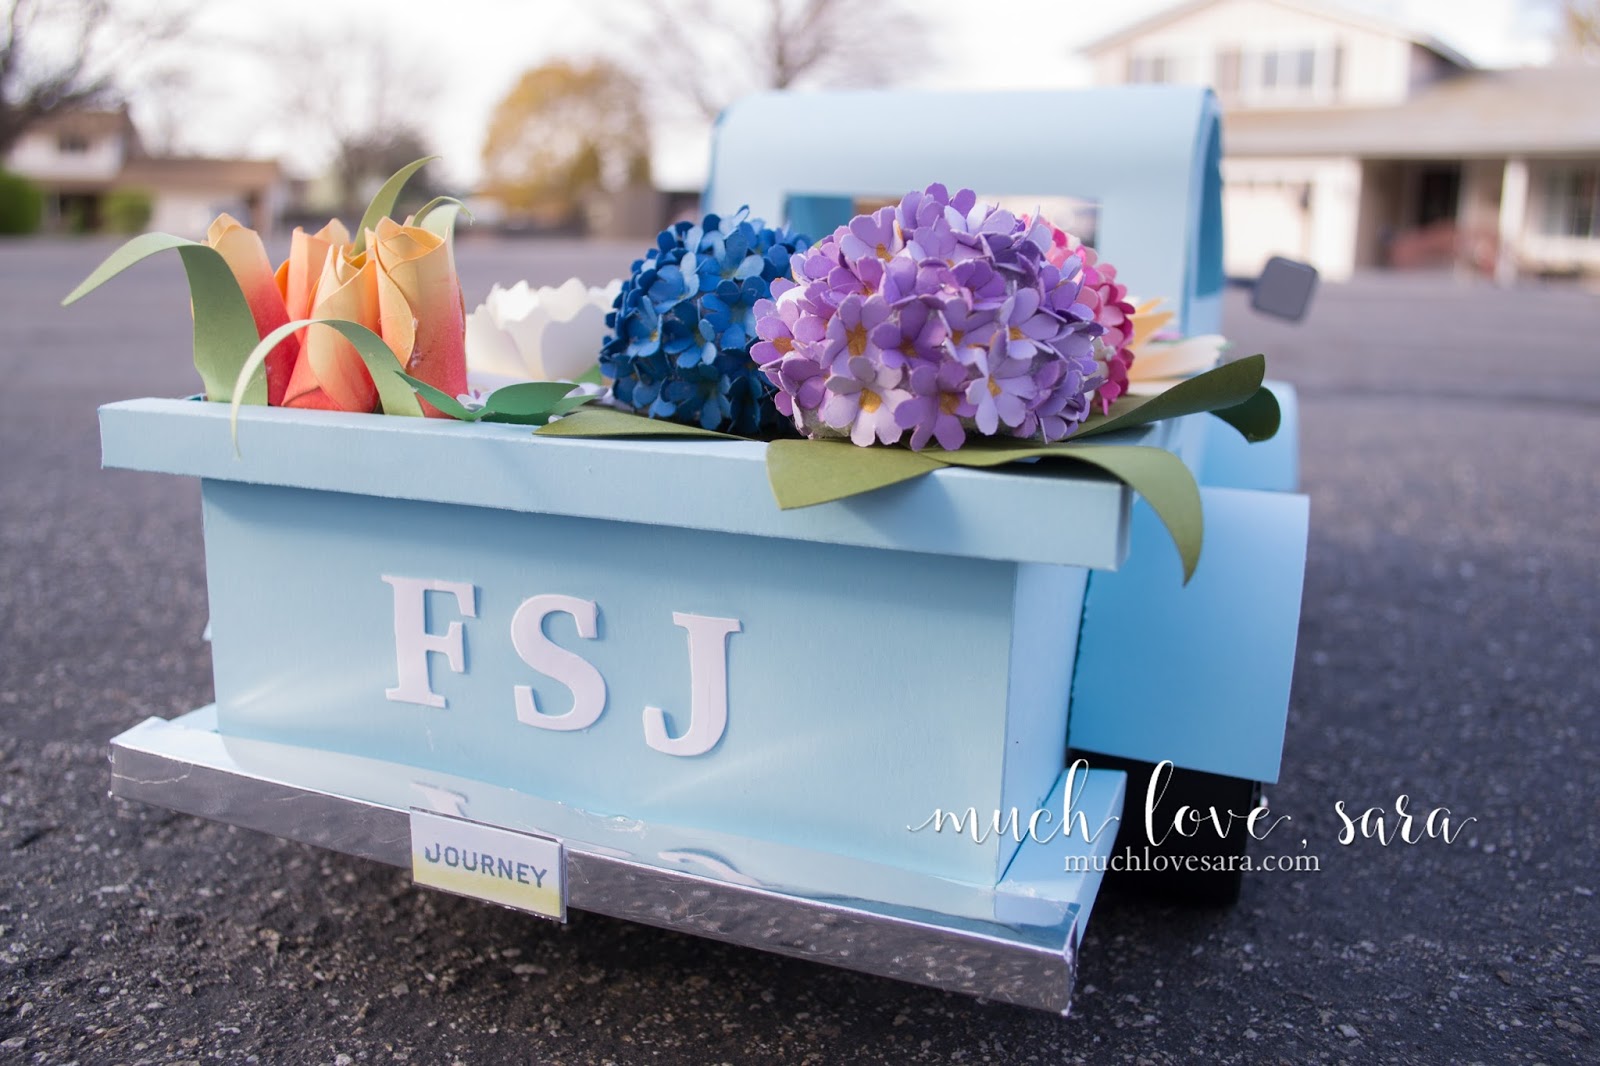
This vintage style truck, with its bed filled with flowers, was entirely created out of card stock by Sara Sherlock for the Inking Idaho on the Road event in Boise.  Fun Stampers Journey card stock, dies, and ink were used to create this showcase decor piece.

The truck "make" is FSJ, of course!  (Added with the Journey Serif Die)

This vintage style truck, with its bed filled with flowers, was entirely created out of card stock by Sara Sherlock for the Inking Idaho on the Road event in Boise.  Fun Stampers Journey card stock, dies, and ink were used to create this showcase decor piece.

The wheels were based on the largest circle die, with smaller circles cut from Mirror Silver paper. 

This vintage style truck, with its bed filled with flowers, was entirely created out of card stock by Sara Sherlock for the Inking Idaho on the Road event in Boise.  Fun Stampers Journey card stock, dies, and ink were used to create this showcase decor piece.This vintage style truck, with its bed filled with flowers, was entirely created out of card stock by Sara Sherlock for the Inking Idaho on the Road event in Boise.  Fun Stampers Journey card stock, dies, and ink were used to create this showcase decor piece.

The truck itself is made from Pool Play card stock, and the bench seat, mirrors, and dashboard were created with River Stone card stock. 

This vintage style truck, with its bed filled with flowers, was entirely created out of card stock by Sara Sherlock for the Inking Idaho on the Road event in Boise.  Fun Stampers Journey card stock, dies, and ink were used to create this showcase decor piece.

This vintage style truck, with its bed filled with flowers, was entirely created out of card stock by Sara Sherlock for the Inking Idaho on the Road event in Boise.  Fun Stampers Journey card stock, dies, and ink were used to create this showcase decor piece.This vintage style truck, with its bed filled with flowers, was entirely created out of card stock by Sara Sherlock for the Inking Idaho on the Road event in Boise.  Fun Stampers Journey card stock, dies, and ink were used to create this showcase decor piece.

The flowers were created using a variety of floral dies and card stock colors. 

This vintage style truck, with its bed filled with flowers, was entirely created out of card stock by Sara Sherlock for the Inking Idaho on the Road event in Boise.  Fun Stampers Journey card stock, dies, and ink were used to create this showcase decor piece.

This vintage style truck, with its bed filled with flowers, was entirely created out of card stock by Sara Sherlock for the Inking Idaho on the Road event in Boise.  Fun Stampers Journey card stock, dies, and ink were used to create this showcase decor piece.

My neighbors got a real kick out of me crawling around on the ground to get these photos.  Oh, the things we do for that perfect shot!

This vintage style truck, with its bed filled with flowers, was entirely created out of card stock by Sara Sherlock for the Inking Idaho on the Road event in Boise.  Fun Stampers Journey card stock, dies, and ink were used to create this showcase decor piece.

I hope you were inspired by this project!  I heard so many amazing comments from people at the Inking Idaho on the Road event this past weekend, and it was fun to make! 

Thanks for stopping by!


Much love,