

What you SHOULD have,
and what you make do without (for now)
Oh boy, can card making get expensive! I added up my "Wish list" at one point, and stopped adding when I got over $3000 (over a third of that was just markers!). With card stock, paper, stamps, markers, inks, die cuts, embossing folders, trims, gems, flowers and other embellishments - it can add up QUICK! And with so much inspiration (for our creations AND our wish lists) available to us with the click of a mouse, it can become quite hard to accept that card making can be done with only the most basic of materials.
Now, granted, the only things TRULY needed in order to begin creating cards are card stock, patterned paper, scissors, some glue, and some inspiration, however, most of us want a finished product that is a bit more elaborate than that result for our time and effort. After all, choosing to make your own cards is as much about enjoying the process of creating, and being proud of the result, as it is about the card that we complete. Which means we will require a few more supplies.
I've tried to be budget conscience in listing the must-have items, while also listing the supplies that will allow you to explore multiple styles. Though, I must state, supplies vary WILDLY from one card maker to another. What one person considers an absolute MUST-HAVE item, another will feel very "eh" about. If you are already aware of what style you will like create in (for example - you know you are a Clean and Simple type, or you know that you don't want to color images) your supplies can be adjusted to fit that style. Also, just because I list an item as must-have, doesn't mean you really have to have it in order to BEGIN card making - again, you only NEED the barest of materials. The "must-have" items are what I feel you should be investing in first - in order to make your cards as good as possible, as early as possible. There's very few times I will recommend a particular brand - brand preference varies from person to person and brands that don't work for me (don't fit my hand, don't "flow" as I use them) aren't necessarily bad products - they just don't trip my trigger.
To make this a bit easier, I've broken the list down into five more manageable categories, then broken down further into specific styles of item. Also, some things may seem a bit odd, but in future posts you will start to see WHY they may be necessary. Let's start!
Tools

Cutting: Your cutting tools are likely going to become some of the most IMPORTANT items you have for card making - particularly in the early stages.
Must-have, buy first: GOOD scissors for cutting paper - sharp with pointed ends that allow you to cut into small spaces; another pair of scissors for everything else; a craft knife with replaceable blades; a self healing cutting mat; and a paper trimmer with replaceable blades and marked increments for measuring, that will allow a sheet of 12 x 12 paper to pass through.
What you'll eventually want: At least one more pair of straight edged scissors (Ideally, you want a pair SPECIFICALLY for paper, one for ribbon/trims, and one strong pair for everything else); a paper piercer; a circle cutter that can handle a variety of sizes; and possibly a variety of decorative edge scissors.
Die cutting/Embossing/Punches: Anytime you can use a tool over and over again to add interest, depth, and embellishment to your card - you save yourself money in the long run!
Must-have, buy first: a regular hole punch, a corner rounder, and a paper edge punch in a style you like.
What you'll eventually want: EVERYTHING! There are so many dies and embossing folders and punches out there. When you choose to get your die cutting machine (Sissix, Cuttlebug, Creatopia, etc.), try and get one with some flexibility. I do recommend that you put a little research into finding the type of machine(s) that fits your needs - however, some machines offer more options than others. Invest wisely and DO consider your machine an investment. It can be your crafty companion for some time! Also, as you build your collection of punches and dies, try to get a variety of what YOU will use. If you plan on buying a lot of premade flowers, you probably won't need a lot of flower punches, if you prefer a clean and simple style, you won't need a lot of the frilly swirls and vines that you might otherwise choose.
Coloring: Colored images add a great visual focus to your cards. This is also the category of tools that can get expensive very quickly. However, with more and more artists offering precolored images - either with the line drawing or separately - and the wide variety of vintage images available relatively inexpensively (even free!), this is also a category that can be "neglected" for a bit, without sacrificing any quality in your finished card.
Must-have, buy first: Coloring pencils in a lot of colors - giant cheap sets even - and a sharpener. Seriously. That's all you need to START coloring. Learn the art of coloring - how to create shadows and dimension, how light falls, how to blend (and, yes, with a soft touch you can blend pencil colors together much like you do when coloring with alcohol markers - without added blending solution).
What you'll eventually want: COPICS! Lots' of Copics! But, quite frankly, ANY alcohol markers will work, and work together. I currently have a mix of Copics, Prismacolors, and Bic Mark It markers that I use along with my colored pencils. I have not used Spectrum Noir, or Promarkers, but they work as well. It all depends on what you have available to you and how much you want to spend.
Adhesive: Don't scrimp on adhesives. You want your card held together, not only until it reaches it's recipient, but for them to treasure afterwards.
Must-have, buy first: Glue sticks, strong wet glue (Tacky glue or other strong craft glue), hot glue gun and hot glue sticks.
What you'll eventually want: Foam dots or tape, an ATG (automatic tape gun - a small tape runner works as well - though depending on how many cards you make, and how much layering you add, you could be going through lots of refills) and refills, clear tape, Glossy accents, E6000, staplers, washi tape, and red line or terrifically tacky tape.
Other Tools: There are far more tools out there, than will fit into neat little categories.
Must-have, buy first: Bone folder, Nail file or bit of sandpaper, heat tool.
What you'll eventually want: Embossing tool; Distressing tool; Brayer; Score board; Sewing needle and thread; craft mat; paper piercing template.
Paper

Cardstock: The workhorse of card making, cardstock can make your card bases, tags, frames, flowers, frills, etc.
Must-have, buy first: a pack of white card stock, colored card stock in colors coordinated with the papers you will use.
What you'll eventually want: A rainbow of colors of card stock in both smooth and textured finishes. Possibly also a variety of sizes, depending on the size of card you choose to create. (More on card bases in next week's post)
Patterned Paper: There are hundreds of paper companies out there making thousands of gorgeous papers - it can be hard to choose just a few to begin with!
Must-have, buy first: a few sheets of patterned scrapbook paper.
What you'll eventually want: Every paper pack ever made! Seriously, though, in terms of card making, Smaller sized (as in height and width - not number of pages!) paper packs are your friend. The patterns are generally the same as the 12x12 papers, but smaller scale - more suited to card making.
Vellum/Specialty Papers: This is not a "must-have" category, but there are numerous transparent, handmade, foiled, and glittery papers out there that can add an amazing pop of interest to your finished card. These papers can get a little pricey, and can sometimes become simply one more thing you spent money on so you could store it - as it can be tough to cut into something really "special". (Somehow crafters tend to become sentimentally attached to certain items in our stash! When it happens to you, know that it's NORMAL!)
Images/Sentiments/Stamps

A section on digital images/ digistamps will be coming on 5/29. However, to begin with there are literally hundreds of artists out there who draw and give away their images. As well as those who seek out copyright free and royalty free images for your personal use. You can collect a wide variety of images and sentiments in a very short amount of time. I would also suggest looking at free font sites, and learning how to install the fonts. Being able to print simple sentiments on your own will be a huge lifesaver! Be sure to pay attention to copyrights as you are collecting images and fonts. While most are fine for personal use, if you are planning on selling your cards, you will want to be certain that the copyright allows that.
You will need to be able to print your digital images/sentiments. As far as stamps go, You will want to have at least one set of alpha stamps to begin (check the dollar bins at your craft store, or local department store). Beyond that, you can build your rubber/clear stamp collection as you find what you like and have money in your budget. Many people prefer rubber or clear stamps over digital, and there are some gorgeous image stamps out there for coloring. Please be sure that you are buying your stamps from reputable companies, and check the copyrights for the stamps as well before sharing a [uncolored] stamped image.
Inks
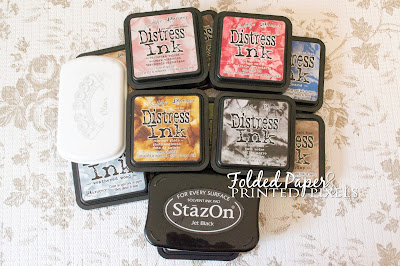
Must-have, buy first: There are only 3 inks that I would say are must-haves to begin with: a permanent black ink like StayzOn or Versafine, and Distress Inks in Black Soot and Vintage Photo. Also, makeup wedges work great as ink blenders at this point.
What you'll eventually want: A rainbow of colors of Distress Inks and permanent inks, ink blending tools to go with the colors, and clear embossing ink. Also you may eventually want to invest in alcohol inks, spray inks, chalk edgers and more.
Embellishments

For the most part, with embellishments, the "what you are eventually going to want" is really going to depend on your style, color preferences, and item availability (for instance, if you prefer to purchase items in person, rather than online, you are limited to what you can find at your local stores). Beyond those limitations, the world is your oyster, because there are SO many options out there. I've tried to cover most of the basics, but, again, personal preferences, style, and budget will change what you feel you need to have at any given point.
Ribbons and trims: Must-have, buy first: White Lace (about 1 1/2' or wider - if you are unsure if you will use much lace, you will likely save some money by buying a yard or two rather than a whole roll), ribbon that coordinates to your chosen paper (the dollar stores usually carry a selection of ribbon, or you can buy small rolls or by the yard), pearl trim, and Jute twine. Eventually, you will want to invest in a variety of laces in white, cream, and black (possibly other colors as well - or you can learn how to dye your own); satin, grosgrain and sheer ribbons in colors to coordinate with your papers; ric-rac trim in a variety of colors; and a variety of fibers. Also cheesecloth and tulle are great ways to add some softness to your cards.
Buttons, gems, and more: I would suggest starting with a small variety pack of buttons that include black, brown, clear, white, and gold tones; self adhesive pearls in white and cream -about 5mm is a good starting size ; self adhesive clear gems in the same size; a variety pack of brads in neutral tones and a pack in a variety of colors. After a while, you may decide to start investing in gem swirls, additional sizes/colors of gems, more buttons, more brads, decorative brads, etc.
Flowers: To start, I would suggest buying a few of the "budget" packs of flat paper/silk flowers. If you decide that flowers are your thing, and you like filling your cards with flowers, then there are numerous tutorials out there to teach you how to make your own flowers, or you can purchase whatever types and colors of flowers that strike your fancy!
Other: Glitter glues, embossing powders, metals, resins, chipboard....the embellishments available once you get going are limited only by your imagination!
Getting Supplies:
Obviously, if you are really wanting to invest in your card making, there are a lot of supplies that can blow your budget fairly easily. I would suggest that, until you have made at least a few cards, and are certain that you want to invest your money into this hobby, that you try to keep any expenses to a minimum - and that really does include investment into must-have items. Once you know that making cards is something you want to pursue, you can begin investing in your "stash" of products and tools to use on your cards.
Once you are in for the long haul, be sure to actually INVEST in your tools. It is better to pay for quality, than pay for something that you're going to have to replace several times before buying the quality piece anyway. Be aware of discounts or coupons available to you, PARTICULARLY for these purchases. Read the fine print in the coupons as well - it may exclude a particular brand or model. Michael's and Hobby Lobby both offer 40% off coupons - which can turn the purchase of a higher priced tool into a real bargain!
Also, it is tempting to be swayed early on by the myriad of beautiful paper packs and gorgeous flowers - but remember that if you blow your budget on these one-time-use items, you're not leaving room for the tools that will turn those items into amazing cards. Make sure you have the ability to cut that gorgeous flecked paper, and put a straight fold into that beautiful cardstock, and adhere the whole thing together!
Be creative and flexible in where you look for craft items. I've found AMAZING items at thrift stores, dollar stores, and even the local farm supply store. Craigslist also has an "Arts and Crafts" section where people are often found selling portions of their stash in lots. Check stores that you wouldn't think of as "craft" stores: my current favorite paper pack has twice the sheets of a "normal" paper pack from the craft store, for half the cost, at WalMart.
Most larger craft stores have "sale" items each week. Pay attention to the sales rotation, and you may very rarely pay "full price" for your card supplies! Even look at what would otherwise be "trash". The envelopes that are in with the bills that you pay online, make great pockets for tags or inserts on cards. The empty cereal boxes are "free" chipboard! That box, that is far to ripped to reuse for shipping, has a wonderful corrugated texture inside of it that can become a background AND dimension to your card.
Also, be aware of services that your local craft/scrapbook stores offer for free or a greatly reduced price with a purchase. They may have punches, die cuts (and the machine!), and other tools available for your use in-store that can help reduce your immediate out-of-pocket costs for these higher price items. And, especially with smaller craft and scrapbook stores, get friendly with the staff! They are the ones that can set aside one of those hot new paper packs that EVERYONE wants - just for you. And they may let you know of upcoming sales or "special" discounts to help you save money! They can also be founts of knowledge when you are stuck on a project, or looking for something new and exciting to add to your cards.
Don't forget that blog candies and trades are also out there if you seek them out. Also, entering challenges gives you a chance to build your digi stash (sometimes other types of companies sponsor challenges as well!) as well as introduce you to new digi artists.
* * * * *
Whew! That's a lot of stuff! No wonder my craft room is bursting at the seams! I know that this particular post can make starting into card making seem daunting - and quite expensive - but please realize that a good portion of the supplies, even the must-have items, can be purchased over a period of time while still creating cards! Also, don't forget that a creative mind can find a way to make things work without the specific tool you would otherwise think you needed. I used my rolling pin for some time, in order to get use out of embossing folders that I had PRIOR to purchasing my Creatopia. And I still keep a butter knife in my craft room because it has so many atypical uses (distressing, burnishing, pallet knife, an extra "bone" folder)!
Next week we will be discussing Card Basics: Making, layering, and laying out your card. See you then!

For those just starting card making: What do you think will be your first "investment" into your supply stash?
For those who have been making cards for a while: Did I miss anything you feel is a "must have" item? And/or tell us about the craziest "tool" you've used in card making that wasn't intended for crafting.
I think I need a long lie down after readin' through this little lot.....what a heap of thought you put into it, Sara.....and so comprehensively covered, too! Can't think of a thing you've missed, but will confess to using a metal pedicure thingy....the type that takes off hard skin...to make my own "flower soft" from styrofoam blocks...hahaa!
ReplyDeleteI know! It felt like I was writing a book - but I hope that it's the most text-heavy post of the series. I just wanted to make sure I was inclusive of multiple types of styles. I think it's a good thing, particularly as a new cardmaker, to try out various types to see what style fits you best. And as people make cards, their style tends to evolve - so it's nice to have some basic supplies on hand to explore that.
DeleteThank you for the tutorial. I am new to card making and will enjoy your card making series.
ReplyDeletelinda