Showing posts with label Embellished Ornaments. Show all posts

Tuesday, November 22, 2016

Warmth to the Season


Don't miss out on the great deals during Online Extravaganza!  Log on today and save on some amazing items!

* * * * * * * * * * * * * * * * * * * * * * * * * * * *

I'm absolutely adoring these Stitched Shapes dies.  And I thought they would pair well with the Cable Knit Embossing Folder.  


Add a little bit of plaid paper and some gorgeous copper to the mix, and you have a lovely warm and and beautiful card.


Thanks for stopping by!


Much love,                                                         


PS.  Want to make the adorable mini hot air balloon shown below?


The Stitched Shape Hot Air Balloon Kit and Tutorial is available NOW!  But only for a limited time.  Get your orders in before November 30th to receive the 40 minutes instructional video, and the kit with all of the parts needed to make this balloon.  Once you learn the basics with this size balloon, you are able to create balloons in a variety of sizes and shapes.  Link to purchase is in the sidebar to the right. 

Tuesday, June 21, 2016

Stampin' on Cookies


I have been meaning to get this tutorial up for a while.  This is a video demonstration of how I used stamps to decorate cookies that were displayed at the Inking Idaho on the Road event back in March of this year.  I've had questions about how it was done, so that others could replicate the project.  This is actually easier than you may think, and would be a fun group project. 


 There is a slight learning curve to the technique, but with the tips I share in the video, you should be able to start stampin' on cookies quickly!


My favorite royal icing recipe:  http://bakeat350.blogspot.com/2010/01/royal-icing-102-or-201-or-whatever.html

Thanks for watching!

***EDITIED: I have done a second video regarding this technique, that also shows how to color in line art style images.  I would love for you to check that out here.***


Monday, March 14, 2016

Stamping on Cookies

This past weekend, I contributed one of the display projects for the Inking Idaho on the Road event, here in Boise and wanted to share what I made.


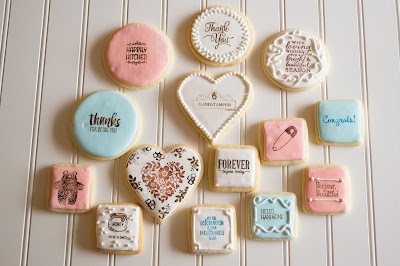
Of course, the project I was most excited about was the handstamped cookies!


The cookies i made were basic sugar cookies (I used my Grandma's recipe, as it is my favorite), that were iced in royal icing that had been allowed to dry before I began stamping.  The stamps were all from Stampin' Up!  As, these were for a display, rather than to eat, I used stamps I already owned.  If you were stamping cookies with the intent of eating them, you want to use NEW stamps, or stamps that have only been used for food use, and that have been properly washed/sterilized.


The "ink" I used to stamp with, was gel food coloring.  I used a sponge to daub the food coloring onto the stamp, to pressed the stamp on the cookie.


A few things I learned: The best stamps for this technique are those that are not super intricate, but also don't have huge areas that stamp solid.  The food coloring does best on a "rubbery" stamp, rather than a clear photopolymer stamp, although you CAN make those work (just be aware that your image will likely not be crisp, and the food coloring will stain that type of stamp).


I found I got the best image by not using a stamp block initially, so that I could press the back of each area of the stamp to get a clear image.  This will help eliminate blank patches due to any uneveness in the icing of the cookie.  Once I had done that, I used a stamp block to pick the stamp up off the cookie.  


Once the image is stamped, you can go back in with icing details, use an edible marker, or dust the cookie with some pearl dust, to finish them.

ETA: I made a video tutorial of how to do this!  Click here to find the tutorial.

Supplies:


Challenges: